Simply Grateful Gardener

Gardening To Fill The Pantry!


3 Comments

Burglar-Proofing Your Strawberries

Last year I learned how to propagate my strawberry plants (check out my post Strawberry Propagation) and ended up with a ton of little plants in need of a home. After setting up the little guys on the side of the house I patiently waited until spring to see if the new plants would flower and bear fruit.

As soon as the weather broke the new strawberry plants picked up right where they left off and began growing. Very quickly they formed tiny flowers which soon turned into berries. Unfortunately the strawberries disappeared almost as fast as they were forming.

Last year we had this problem with our original plants and thought that perhaps the squirrels were making off with our bounty. This year I learned it wasn’t the squirrels, or at least not only the squirrels, but also the birds that were making short work of the strawberries that were forming. What I couldn’t believe was that whoever was stealing the fruit, wasn’t even waiting for the strawberries to turn red. No sooner would a green berry form, and the next day it would be gone.

Frustrated and out for blood I decided something had to be done. Seeing as bear traps and land mines might have been considered over-kill, I opted to fall back on my ever-favorite gardening helper — PVC pipe. I outlined one of the areas where the strawberries had been planted with a PVC frame, made legs that would raise it about 12″ from the ground and then covered it with deer block netting being sure to drape it over the sides so nothing could sneak in underneath. I was going to use bird block netting, but it was more expensive so opted for the deer block instead.

The completed frame in place.

The completed frame in place.

Once the frame was made I carefully placed it over the strawberry plants and waited. Although there were two other areas where the strawberries were being eaten, I didn’t want to invest the time and money into making the frames if 1. it didn’t work or 2. the netting stopped the bees from pollinating the flowers. I wasn’t as concerned about the frame not doing its job as I was about the bees being able to get in and pollinate. Strawberries will form without pollination, but they would be deformed and small.

DSCF5382

For several weeks I watched as flowers formed and then tiny strawberries took their place. Slowly the strawberries began to grow and then turn red.

DSCF5378 DSCF5383 DSCF5379 DSCF5380

Success!

Not a single berry has been stolen or damaged and there are strawberries on every plant. Unfortunately the other two areas where the strawberries are haven’t fared so well. This is going to be remedied however when I make a frame for each of these areas as well.

This is going to be one monster of a strawberry!

This is going to be one monster of a strawberry!

This might not be the answer for everyone as you might have a strawberry patch too big to allow making a frame like this economical or practical, but for my tiny 10 foot by 4 foot patch it is perfect. The only change I might make to the currently standing frame is to put an additional support/leg in the middle of the longest side to give it additional support. Plus I need to remove all the rocks so all the runners can be propagated and planted in between the existing plants.

My strawberry plants produce fruit all summer. Now that my frame has secured the plants I’m sure to be enjoying mouthfuls of sweetness well into September, and for this I am — Simply Grateful.


9 Comments

Rainwater Harvesting – Rain Barrel Crazy

Last July Hubby and I installed our first rain barrel for harvesting rainwater. At the time I wasn’t sure if this was legal in Michigan, but have since learned that the only two states that had laws against rainwater harvesting were Colorado and Nevada. Michigan, in fact, has legislation that encourages homeowners to collect and use rainwater.

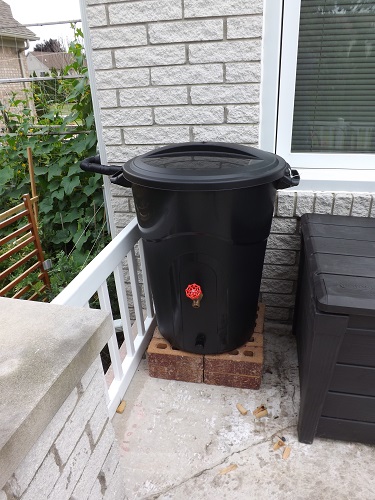
For our first rain barrel I purchased a kit from Wal-Mart as well as a brand new 32 gallon garbage can. The kit cost around $20 and the can was $8, so for a $28 investment I thought it would be a good way to save some money on water bills.

It took us less than 1/2 and hour to install the rain barrel.

DSCF0143a

All summer as the rain barrel would fill, I would empty it into my watering can and water as much of the gardens and potted plants as I could before opting to use the hose attached to the house. This was so successful, because we had a fairly regular pattern of rain and dry spells, that this year I decided I wanted to expand our water collecting.

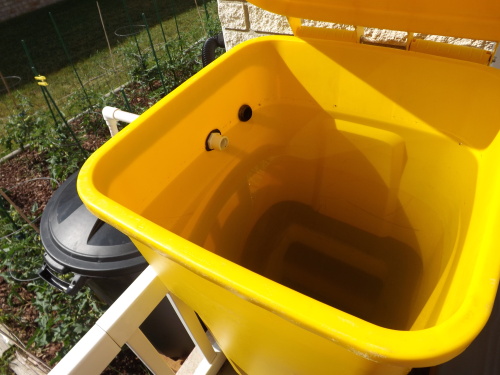
Although they do sell connector kits to attach rain barrels so as one fills it will overflow into the next, Hubby decided he could rig something up using — what else — PVC pipe. This would be a fairly inexpensive investment. The major expense would be in purchasing additional rain barrels/garbage cans and another initial rain barrel kit to attach to another downspout on the other side of the house.

Being frugal when it comes to spending money even on things that will eventually save us money in the future, I really did not want to fork out the money for more garbage cans. I mean if Hubby could come up with a way to attach the rain barrels together without having to buy the connecting kits, there had to be another option for the garbage cans as well.

Do you believe in: The universe shall provide? Well, I do, especially after what happened.

A few days after we decided we were going to expand our rain collection, we received a notification from our garbage collecting service that we would be issued a brand new 50 gallon garbage can (free of charge) that we would be required to use for all garbage pickup. They went on to state that any other trash cans could either be left on the curb for pickup/recycling or labeled with a “Compost” sticker and used for that purpose.

So being a daughter of a true sheeny-man-at-heart father, I knew what I had to do. The Sunday after the new garbage cans were delivered, which is the night before our garbage pickup, Hubby and I headed out into our subdivision in search of garbage cans with notes stuck to them stating “PLEASE TAKE.” That’s all we needed!

Within two weeks we had collected 6 perfectly usable garbage cans with lids. Four of them would be used for additional rainwater collection while the other two would be used for compost (why buy those paper bags when you can keep reusing the plastic cans?).

What luck! So for about $30 (which included the complete rain barrel kit we had to purchase for $20 to attach to a different down spout) we had four more rain barrels set up and ready to go. Three barrels were installed on the side of the house with room for more if I want.

DSCF4730

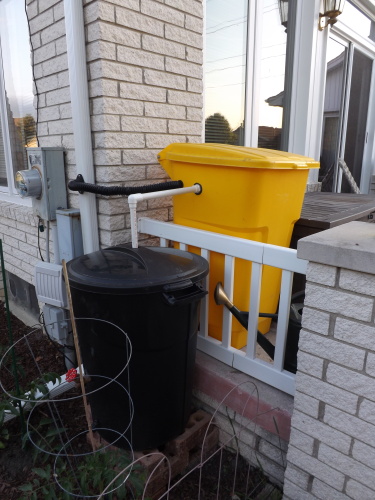
The black tube running from the down spout to the garbage can in the back fills that can first, then any overflow is run to the can in front of it as well as the one to the right. In retrospect Hubby thinks we should have attached the cans together at the bottom with the PVC pipe so they would all fill up at the time. I’m not so sure. This year the rain water has been nearly non-existent, so rather than having one can full, I’d have three cans 1/3 full. Much harder to retrieve water from using a watering can. For now I’m content with they way he set them up.

The first rain barrel that was installed last year was moved into the garden directly below where it had been attached and a 50 gallon Rubbermaid garbage can that we found in someone’s trash was put on the patio.

DSCF4738

Once the yellow can fills, the overflow goes into the can in the garden.

In all we now have the ability to collect 178 gallons of water with still room for expansion.

Now this is all well and good, but there is one catch to this wonderful rain harvesting system — it has to rain in order to use it!!!!

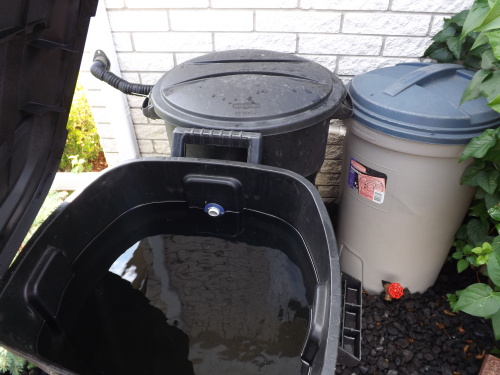
We installed all the new rain barrels at the beginning of June and since then we have not had enough rain to fill one rain barrel even half-way, let alone five. It has been very frustrating. Then, last night while we slept it happened! You got it — IT FINALLY RAINED. And we’re not talking just a passing shower. No, we got enough rain to fill every one of our rain barrels.

DSCF5135 DSCF5136

I didn't take a picture of the other two full barrels, but they get filled before this one. Trust me, they are all full.

I didn’t take a picture of the other two full barrels, but they get filled before this one. Trust me, they are all full.

Success! And now we are really getting ambitious. Hubby doesn’t like the fact that I plan on just using my watering can to empty the barrels. It doesn’t bother me to walk back and forth, and in fact it would be a great way to workout my biceps, but Hubby has bigger ideas. He wants to invest in a pump that we would place in the full rain barrels and then attach to our hose and use it to water the gardens that way. It would be about a $60 investment, with coupons, and would save me a lot of time and he thinks aggravation.

I’m still not completely sold on the idea, probably because I haven’t had the joy of emptying all five barrels yet, but it is an option. For now, I am excited to have all my rain barrels full, the garden presently drenched with rain water, and a day off of watering, and for this I am — Simply Grateful.


12 Comments

Tomato Leaf Curl Epiphany

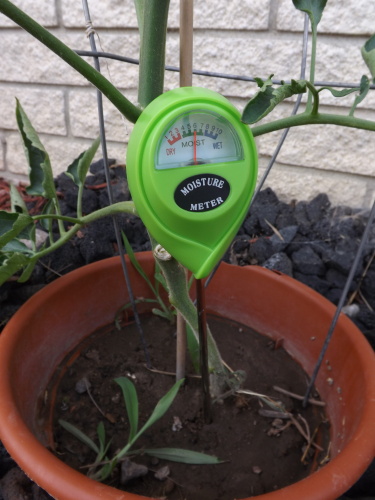
So in order to try to help resolve the tomato leaf curl situation in the garden, I ended up investing in a moisture meter.

DSCF5013

I say “investing” but it only cost about $6 from Wal-Mart.  This little gizmo is obviously at the low-end of the spectrum on moisture meters, but I figured for a start it would be fine.

When I took it out of the package I immediately started testing it on the house plants. Everything came out on the dry side. I watered and measured the moisture again and this time the level was right in the middle. Perfect.

Heading outside I started with the tomatoes planted in the big garden. We’d had rain the night before so I figured there should be some reading. I was right. It was right in the middle.

Then to the side of the house where the tomatoes are planted in small boxes with either mulch or rock around them as well as a planter top marking the base of the plant and giving me a guide for watering. These too showed they were moist enough.

The meter is right in the middle, where it should be.

The meter is right in the middle, where it should be.

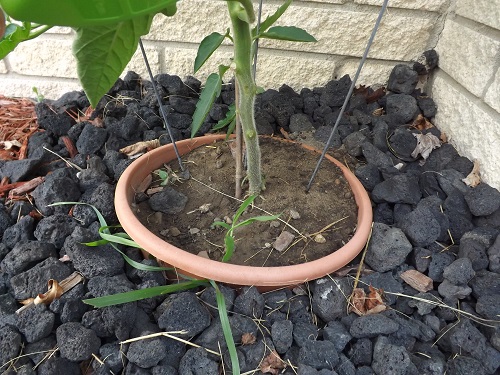
On further inspection though I noticed that the planter tops that were around the bases of the three plants with severe leaf curl were smaller. This meant that when I watered them, they would not get as much water as the other plants. Could this be why these are pretty much the only plants in the ground that are affected?

Small planter top.

Small planter top.

Larger planter top.

Larger planter top.

I tested my theory last night when the moisture meter indicated the plants were dry enough for watering. When I watered the three plants with the smaller planter tops, I watered them twice, filling the space around the roots twice with water.

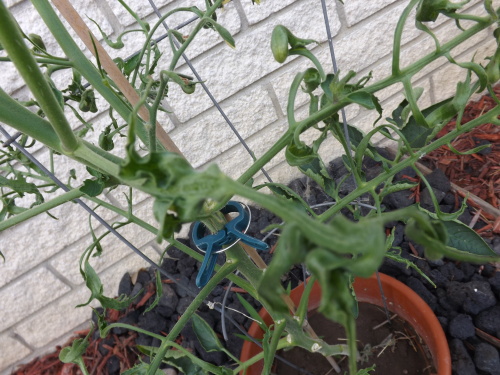
When I went out to the tomatoes this evening, 24 hours later, already some of the curly leaves are uncurling!

DSCF5005 DSCF5006 DSCF5007

Success!? Well, if there’s one thing I’ve learned in gardening — Don’t get too excited. Who knows if what I did made a difference. It could be the actual rain we got a few nights ago, it could be that the weather has been cooler, or what I’m really hoping for — it was me watering them twice.

Well, after noting that the tomatoes on the side of the house seemed to be doing slightly better, I headed to the tomatoes planted in pots. These too have been fighting the leaf curl a lot more than the plants planted directly in the ground. With these I have been sure to water them until the water flows from the bottom of the pots. When I checked for worsening leaf curl, there was none. In fact they too seemed to be improving.

The evidence seems to support the fact that I have been under-watering, so I am going to continue watering more and using my moisture meter to gauge when I should be watering. Just looking at the soil is deceiving. This pot here looks like it’s bone dry and yet when I put the meter in the soil it comes out right in the middle. I won’t water now until tomorrow.

See how the dirt looks completely dry?

See how the dirt looks completely dry?

But when the moisture meter is inserted, it's moist.

But when the moisture meter is inserted, it’s moist.

I’m not sure if anything has been resolved, but it does seem like I’m getting closer to a solution/cause for the tomato leaf curl in my garden, and for this I am — Simply Grateful.


8 Comments

Building A Garden Fence With PVC Pipe

Last year after I expanded my garden I needed to fence it in to keep out the bunnies, neighborhood dogs, and stray cats. I found some chicken wire at a garage sale for $5.00 and wrapped it around the garden using stakes at the corners and mid-points to hold it up.

At the beginning of the summer the fence stood up pretty good and kept out unwanted critters. By mid-summer and especially late-summer, however, the fence began to sage and lean in towards the plants. Eventually it got so bad that I had to put plant stakes every couple of feet in order to keep it from falling on my plants.

This year, when I decided to expand the garden even more, I knew I would have to find some way to “fence” in my garden in such a way that I wouldn’t have to worry about it falling all over my plants. My first thought was to use 1″ x 2″ x 8′ pieces of wood to make a frame to staple the chicken wire to. The sections would be 8 feet long and 2 feet high. I bought the materials to make one section to see how I liked it.

After completing the section and attaching the chicken wire to it, I decided that it was really more cumbersome than I wanted it to be. It would be hard to use one continuous piece of chicken wire for the entire fence when each section would have to be stapled and installed independently of the others. So, back to the drawing board I went.

Thinking back to when I used to home school my kids, I remembered that I used to use PVC pipe and connectors for any number of things. From chart stands to building blocks to geometric shape models, I always found a use for it. PVC pipe would be weather-proof, sturdy, and flexible when it came to framing the entire garden. Cutting it would be no problem and with the wide variety of connector options, there was nothing standing in my way.

For my 16′ x 32′ garden it took 25 – 10 foot sections of 1/2″ PVC pipe, 32 t-connectors, 8 elbows, 8 – 3-way side elbow’s, and 8 male adapter sockets. For right around $50.00 I was able to fence in the entire garden, make it look neat and clean, and eliminate the threat of any animals trespassing into the garden or floppy fence sections falling on top of my plants.


First I cut each 10′ section of pipe in half. This made each fence section easy to manage and helped ensure that the pipe wouldn’t sag.

DSCF4395

To connect the sections together I used t-connectors and a smaller section of PVC pipe cut to fit the height of the chicken wire perfectly and then screwed the bottom t-connector into the landscape timbers framing the garden. The chicken wire was run along the inside of the garden for aesthetic purposes and secured with zip ties.

DSCF4398

When I reached a corner I used the 3-way side elbows with a male adapter and more PVC pipe. Again the bottom 3-way elbow was screwed into the landscape timbers for stability.

DSCF4399

I also bought a garden arch that I wanted to put in the garden to mark the “entrance.” This meant I needed to make a gate. Not wanting to get too complicated, I used elbows to make a frame that fit perfectly between the sides of the arch and pulled the arch just far enough away from the landscape timbers so I could wedge the gate there when not working in the garden. To remove I just lift slightly and remove it.

DSCF4396

I used the chicken wire I bought at the garage sale last year for the entire garden except the gate. I was short just that much. Fortunately, while Hubby and I were driving around one evening I happened to see a small section of wire fencing in someone’s garbage. I threw it in the trunk and viola! it fit perfectly.

I love my new fence. I think it makes the garden look like a real garden and not just a really big sandbox. Even my neighbors have stopped by to tell me how nice it looks. One of them even went so far as to suggest I send it in to Home & Garden magazine.

DSCF4394

I’m not going to take it that far, but boy am I proud of my work. A little ingenuity, a few sections of PVC pipe, and some time well spent equals a fence that should last a long, long time, and for this I am — Simply Grateful.


Leave a comment

The House of Many Milk Cartons

Our house will probably forever more be called “The House of Many Milk Cartons.” Hubby lovingly/mockingly referred to our house as this as I’ve been collecting them since last summer and since work began outside for the garden expansion and preparation for seedlings, it looks as if we are growing them!

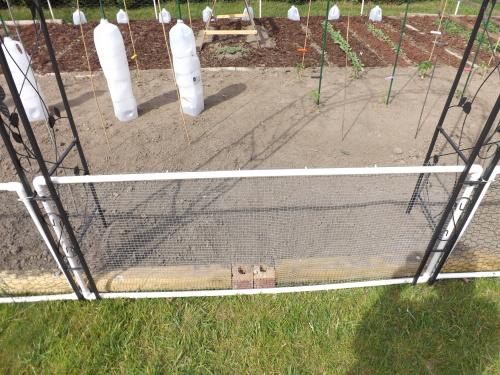
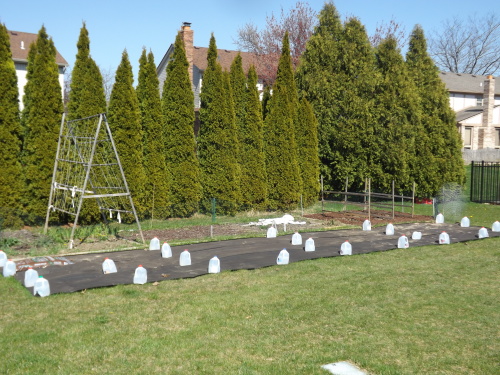
As soon as the snow melted in the early spring, I laid out tar paper to kill the grass for the new garden expansion. Milk cartons filled with water were used to hold the paper in place.

As soon as the snow melted in the early spring, I laid out tar paper to kill the grass for the new garden expansion. Milk cartons filled with water were used to hold the paper in place.

Once the cartons were done being used to hold down the tar paper, I emptied the water into a rain barrel and cut them down so when the pepper garden is ready to be staked out, I can use them when the plants are moved from the greenhouse to the ground.

Once the tomato garden was turned over and the soil readied for planting, I staked out where the plants would go once the weather was warm enough to transplant the seedlings and a milk carton (bottom removed) placed over the stake.

When the tomato garden was turned over and the soil readied for planting, I staked out where the plants would go once the weather was warm enough to transplant the seedlings and a milk carton (bottom removed) was placed over the stake.

The milk cartons will allow me to transplant the seedlings directly from the greenhouse to the garden without worrying about hardening off. I just need to make sure the temps stay above 50 degrees.

The milk cartons will allow me to transplant the seedlings directly from the greenhouse to the garden without worrying about hardening them off. I just need to make sure the temps stay above 50 degrees.

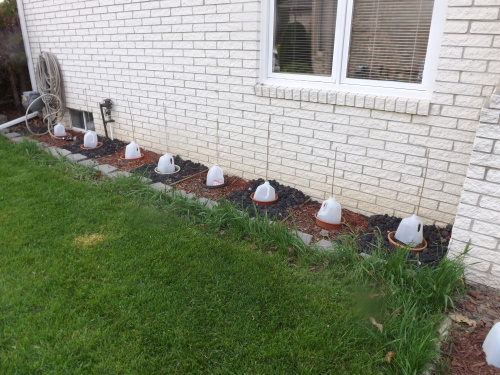
The milk cartons are also being used to insulate bean seeds that have been planted directly in the ground. With mulch sealing the bottom edges of the carton to the ground, the ground is kept warm enough for the seeds to get an early start.

The milk cartons are also being used to insulate bean seeds that have been planted directly in the ground. With mulch sealing the bottom edges of the carton to the ground, the ground is kept warm enough for the seeds to get an early start.

There are a ton of uses for milk cartons in gardening. I use them to hold liquid plant food mixes, as scoops for transferring soil to pots, and as weights to hold down tarps or sheets when covering plants to protect them from frost. Being able to reuse these in a productive way — upcycling, is something I am always on the lookout for when it comes to my garden.

For the next month or so our yard will be full of milk cartons, probably much to our neighbors dismay. As for me, I’m glad to be able to use them to protect my plants and make quick work of many gardening projects, and for this I am — Simply Grateful.