My second garden project this year was a small greenhouse frame to cover a portion of the back garden. Wanting to get a jump-start in the garden, my goal is to get a good sampling of the root vegetables planted before April 1st. I doubt this is going to happen, but with this second area complete, I’m one step closer.
Being that I have never planted this early, and not knowing how well these greenhouses are going to keep my plants protected from the still potentially cold Michigan weather, I’m planting a sampling of the crops I wanted for early spring rather than everything all at once. Don’t want to get caught with all my eggs in one basket. One row of carrots, two rows of various types of lettuces, and a row of beets was the plan for this new greenhouse. If these structures maintain the temperatures enough for root vegetables to start in Michigan one month before the typical planting, it could mean more than two crops of carrots, radishes, turnips, and especially lettuce. Continue reading →
Because of circumstances beyond my control, the garden is going to have to be either smaller this year or planned in such a way that it will require far less attention from me. Physically I seem to be struggling, so in order for Hubby to agree to a garden at all, I had to agree to some new terms. Man I hate getting old!
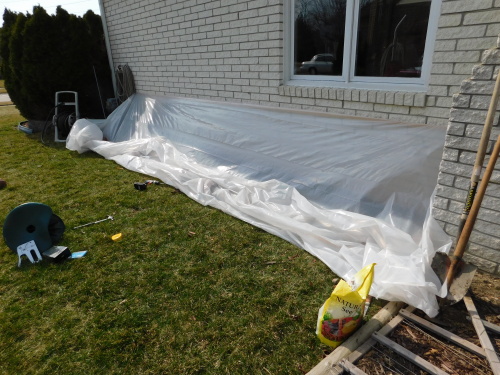
Realizing I have some strict limitations, this year I have decided to try a few new crops that will hopefully prove to be fairly self-sufficient. In order to protect them from the elements, however, and to get a jump-start in a Michigan spring, Hubby agreed to help me build a few make-shift greenhouses.
Actually I wanted to make hoop houses, but as with most things, Hubby had a better idea. In this case, I do agree with him. The idea he came up with for the first area I wanted to work in, turned out very nice.
Spring in Michigan is always unpredictable. One day you can have 70 degree temps and sunshine and two days later you can have 20 degree temps and three inches of snow. Such has been the case since early February around here. So, even though the weather predictions were for 50 degree weather for the next ten days, I know from experience that these forecasts are less than reliable. Thus my justification for wanting to build an enclosure for early spring planting.
There are a lot of crops that can be planted as early as mid-March in Michigan, depending on where you are located. I am near the southern part of Michigan, so mid-March is perfect for this type of early planting. Peas, carrots, turnips, beets, potatoes, lettuce, broccoli, cauliflower, and cabbage are just some of the possibilities.
My choice for our first project this year was lettuce. We have been eating salad nearly five times a week with dinner and have been enjoying a wide variety of lettuces. Growing our own sounded like a fun new challenge and being that many of the lettuces out there continue to grow all season, I couldn’t wait to get started.
The first step was to prepare the area. All I really had to do was make a path down the mulch covered bed, dig a little trench, place the seed tape in the trench (can’t get any easier than seed tape), bury the tape, water, and cover with a little organic dirt. I am so glad I took the time last fall to clean up and prepare most of the gardens for the following year. This should hopefully mean a quick and easy beginning to the gardening season.
Slight trench in prepared bed.
Seed tape placed in trench, covered lightly with soil.
Organic soil placed on top of trench.
Completed lettuce bed.
Once I was done with the little bit of work it took to get the lettuce seed tape planted, Hubby came out to work on the greenhouse. He decided that attaching one side of the greenhouse frame to the house would be the easiest method. I never would have thought of that, as I can never drill into the mortar without messing up the holes for the screws. Hubby got this done without any problems.
I attached the plastic to the boards that we then attached to the house and then simply attached the other side of the plastic to more boards, trimmed the plastic, and secured the boards to ground with bricks. Spring can be very windy here in Michigan, especially come April, so staking the boards would not be enough. Several bricks along the length of the boards should hopefully get the job done.
In a matter of two hours the lettuce garden was planted and protected, and just in time. Because although it was nearly 74 degrees here yesterday and sunny, the temps went down into the upper 30’s last night and we have had heavy rain and winds all day today with temps in the 40’s. If I’d left the lettuce bed to the elements, I’m sure my seeds would be long washed away. As it is, the lean-to greenhouse is holding up well, and the ground is still quite warm because of the insulation of the plastic, and for this I am — Simply Grateful.
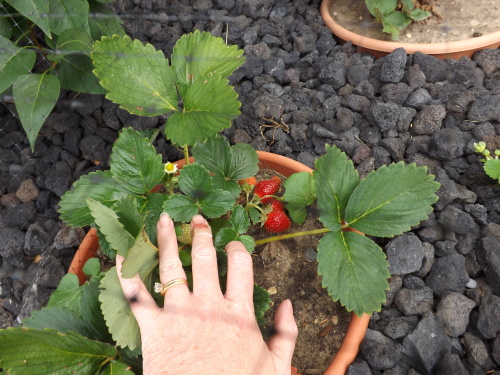
Last year I learned how to propagate my strawberry plants (check out my post Strawberry Propagation) and ended up with a ton of little plants in need of a home. After setting up the little guys on the side of the house I patiently waited until spring to see if the new plants would flower and bear fruit.
As soon as the weather broke the new strawberry plants picked up right where they left off and began growing. Very quickly they formed tiny flowers which soon turned into berries. Unfortunately the strawberries disappeared almost as fast as they were forming.
Last year we had this problem with our original plants and thought that perhaps the squirrels were making off with our bounty. This year I learned it wasn’t the squirrels, or at least not only the squirrels, but also the birds that were making short work of the strawberries that were forming. What I couldn’t believe was that whoever was stealing the fruit, wasn’t even waiting for the strawberries to turn red. No sooner would a green berry form, and the next day it would be gone.
Frustrated and out for blood I decided something had to be done. Seeing as bear traps and land mines might have been considered over-kill, I opted to fall back on my ever-favorite gardening helper — PVC pipe. I outlined one of the areas where the strawberries had been planted with a PVC frame, made legs that would raise it about 12″ from the ground and then covered it with deer block netting being sure to drape it over the sides so nothing could sneak in underneath. I was going to use bird block netting, but it was more expensive so opted for the deer block instead.
The completed frame in place.
Once the frame was made I carefully placed it over the strawberry plants and waited. Although there were two other areas where the strawberries were being eaten, I didn’t want to invest the time and money into making the frames if 1. it didn’t work or 2. the netting stopped the bees from pollinating the flowers. I wasn’t as concerned about the frame not doing its job as I was about the bees being able to get in and pollinate. Strawberries will form without pollination, but they would be deformed and small.
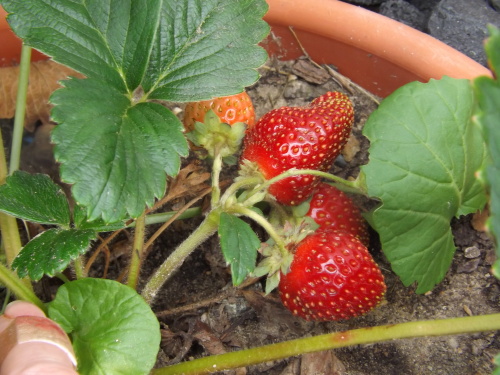
For several weeks I watched as flowers formed and then tiny strawberries took their place. Slowly the strawberries began to grow and then turn red.
Success!
Not a single berry has been stolen or damaged and there are strawberries on every plant. Unfortunately the other two areas where the strawberries are haven’t fared so well. This is going to be remedied however when I make a frame for each of these areas as well.
This is going to be one monster of a strawberry!
This might not be the answer for everyone as you might have a strawberry patch too big to allow making a frame like this economical or practical, but for my tiny 10 foot by 4 foot patch it is perfect. The only change I might make to the currently standing frame is to put an additional support/leg in the middle of the longest side to give it additional support. Plus I need to remove all the rocks so all the runners can be propagated and planted in between the existing plants.
My strawberry plants produce fruit all summer. Now that my frame has secured the plants I’m sure to be enjoying mouthfuls of sweetness well into September, and for this I am — Simply Grateful.
They might not be the biggest harvests, but yesterday and today I was able to go out to the garden and pick vegetables! Can it get any better than that? Finally all the hard work is paying off.
Yesterday I picked 3 cucumbers, 3 Romanian bell peppers, and 3 large zucchini that I can’t believe ballooned up so quickly. They were just finger length three days ago.
Then today I went out and found 4 more cucumbers, another huge zucchini (where did this come from), the first two cherry tomatoes, and peppers.
I actually wasn’t planning on harvesting the peppers yet but the plants are so full I needed to thin them so the peppers could actually grow. They were all crammed against the stem and beginning to curl.
The banana peppers will be canned so they can be picked at any size really. I was just hoping to wait a bit so they’d turn red and I could have a variety of colors in the jars. Oh well, looks like there’ll be more to come (lots more) so I’m sure I’ll get the chance.
The Anaheim I’m not sure if are ready or not. There are some websites that say to wait until they are red, while others say the green ones are fine. They sell green ones in the stores, so I’m assuming picking them will be okay.
These I’m going to roast tomorrow and can — or if Hubby is real persuasive I might make him some chili rellenos.
Lastly, I picked what might be the last of the peas. Some of the plants are beginning to dry up and there aren’t too many flowers. I’m not sure if I should leave the plants in the ground and wait to see if they’ll produce again in the fall or if I should pull them out and plant a new crop for the fall. Any suggestions?
Seeing the fruits of my labor really helps keep gardening in perspective and boosts my spirits in lieu of all the difficulties we’ve had this week, and for this I am — Simply Grateful.
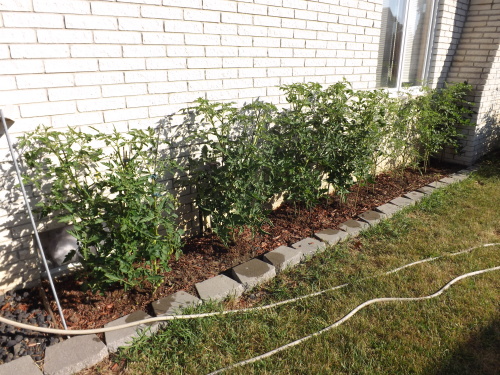
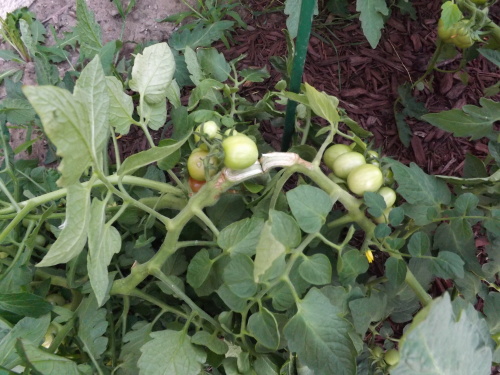
This morning as I examined my tomato plants for any damage during last nights storm I found the beginnings of what appears to be Early Blight. I dealt with this last year on nearly every one of my tomato plants and ended up cutting so many of the leaves away that the tomatoes got sun scald.
This year I was hoping to avoid this problem by moving the tomato garden to the opposite side of the house. No such luck.
The good news: I caught it early. It appears that the only plants affected right now are the pear tomato plants. The only plants already having a hard time keeping their leaves healthy. I swear, these little buggers (pear tomatoes) are so temperamental. I can’t catch a break with them. First, they are the only plants with the leaf curl, which has pretty much spread to every pear tomato plant regardless of where they are in the yard. Next, they are growing so tall that I don’t have cages or stakes tall enough for them. (My research, which I did just today, tells me they can grow as tall as 12 feet. Who’s going to get a ladder to pick those puppies?) And finally, they are now coming down with blight.
Yet I have to say the one good thing about all this is at least I know these plants are not GMO. If they were they certainly wouldn’t be having all these problems. Hubby says if I can beat all the stuff going against us with the pear tomatoes and actually get a good harvest this year, maybe next year we’ll have enough know-how to grow a healthy garden full of them — enough to sell at the local market. Being so difficult to grow they would fetch a hefty price. At the moment though it sounds like a whole lot more work than I’m up for.
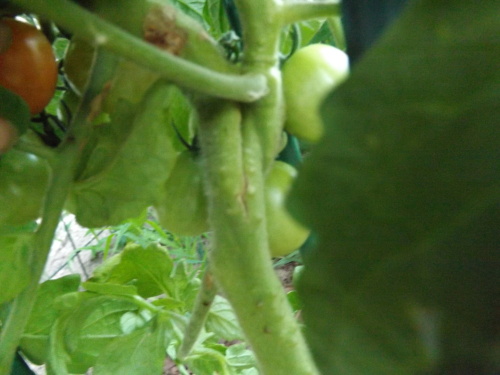
As for the blight, it is a highly contagious fungi that could easily spread to all the neighboring tomatoes. To overt this, I immediately mixed up a batch of baking soda and water and sprayed each and every tomato plant. I soaked the top and bottom leaves and was sure to get the trunk all the way to the ground. This needs to be done once a week and after every rain.
When making the baking soda and water spray I used 1 tablespoon of baking soda for every gallon of water. This should work well for the above 80 degree weather we’ve been having and are predicted to continue having throughout the next 15 days. If it were cooler I could use a higher concentration of baking soda, 2 tablespoons for every gallon, but if I were to use that now I’d risk burning the leaves.
Before spraying the plants I inspected each plant closely and removed all infected leaves. There were only six stems on five plants (all pear tomato) that had to be removed and put in the compost bin for the trash man.
I’m not sure exactly why the plants are getting Early Blight, but one cause could be watering at night. The best time to water tomato plants is in the morning so they have the entire day to dry out. I have been doing this, but there have been a few times when I didn’t get out there until evening. From now on I will be sure to water in the morning or at the very least if I have to water at night only water the base of the plants with the watering can so as to not get the leaves wet.
So the tomato plant saga continues. Every day brings something new to deal with. So far my spirits are still fairly optimistic, but honestly the pear tomato plants are really wearing me down. What is so disheartening is I read on the internet today that these plants are known for the high production. They have been known to regularly produce between 100 and 200 tomatoes per plant. I seriously doubt my plants are going to reach even half that. There are probably about 20 – 30 tomatoes on the healthiest plants and only flowers or a handful of tomatoes on the plants worst hit by the leaf curl. I keep thinking…what could have been.
Oh well, can’t worry about that now. What’s important is to keep the tomato plants as healthy as I can for as long as possible. The pear tomatoes were only supposed to be for fun and eating. I’ve got to stay positive if I want to be — Simply Grateful.
Just when I thought it was safe to go back into the garden…
Last night before calling it a night I headed out to the garden to see if any plants needed a drink, some pruning, or a bit of a pep talk. It had been hot and humid, well above 90 degrees, and sunny most of the day. Having been such a hot one, Hubby and I hid out in the house catching up on anything we could find to do that didn’t require leaving the comfort of our air conditioning. Being on the inside looking out all day, the day seemed calm, almost tranquil, an illusion that would soon be set to right.
As I rounded the corner of the house and peered at my tomato garden the first thing I noticed was one of the yellow pear tomato plants that was planted right next to the house on the ground. What was strange about that, other than tomato plants don’t typically lay flat on the ground, was that the cage surrounding the plant as well as the 4-foot plant stake the tomato plant had been clipped to were on the ground too. The cage and stake had been pulled completely out of the ground.
Panic set in as I ran to the plant to survey the damage. Thankfully the stem had not broken. In fact, other than it being on the ground rather than standing its full height of more than 4 feet, it was perfect. As I picked up the cage, plant and stake and began positioning them back in place and in the ground I began to wonder how this could have happened. My first thought was that some neighborhood kids had decided to vandalize my garden. Not that this sort of thing happens often, but things do happen on occasion. I hated to place blame or even think such a thing, but it did not seem possible that wind could cause something like this.
Once the plant was securely in place I returned to surveying the remainder of the tomato plants. Looking into the garden that holds 33 of my plants I noticed one of the plants looked odd. The plant closest to the end against the house had been nearly 5 feet tall, and now I looked as if it weren’t there at all.
Closer inspection revealed that this plant was split completely in two.
Now I was really mad. Had some kids thrown a basketball into the garden and taken out one of my two cherry tomato plants? Had some dog chased a rabbit into my yard and barreled through the garden in so doing? What was going on?
I was devastated. The plant was full of huge cherry tomatoes, some even on the brink of turning red. There had to be more than 50 tomatoes on this plant. It was full of lush thick leaves that seemed to multiply daily even though I pruned them constantly. There were branches full of flowers and the beginnings of yet more tomatoes. I’m not exaggerating when I say this one plant would have no doubt yielded more than 100 tomatoes on its own.
Standing there, heart-broken, I bent over and grabbed one half of the plant. Carefully I lifted it, noticing immediately how heavy it was. Gingerly placing it back on the ground I lifted the other half. This half was even heavier. The wheels in my head began to turn.
Standing back up I examined the area where the plant had stood. There was a sturdy 4-foot garden stake still standing with the plant clip attached. Reality was beginning to set in.
This wasn’t the work of some feisty neighborhood kid or rambunctious dog on the rampage, no this was far more serious. This was something that would surely threaten every tomato plant in my garden if I didn’t take action.
What was the cause of the first tomato plant falling to the ground and this tomato plant split?
Too much bounty!
Honestly, with all the difficulties I have had this summer with my tomato plants, having TOO much fruit was one problem I never thought I’d have to deal with. The heat and humidity have caused the tomato plants and their constantly multiplying tiny tomatoes to grow faster and larger than their stems and trunks can handle.
Looking closer at the other plants in the garden I noticed branch after branch laden with tomatoes bending close to breakage toward the ground. Even though every plant had been staked and most had cages around them as well, they were far too big and heavy for their own good.
Back to my split tomato plant though.
Before I could address the rest of the garden, I needed to fix or at least try to fix this cherry tomato plant.
Tomato plants are very resilient and even when struggling against blight, sun scald, leaf curl, or any of the other countless things that can go wrong when growing tomatoes, they somehow overcome. Branches or even the trunk of the plant splitting is no exception.
My first task was to set the trunk back together as best I could so it could heal. I didn’t have anything to treat the wound with, to protect it against pests, so I set the sides as close together as I could and used additional plant stakes and clips to set it in place. It took four heavy-duty stakes and seven clips to put Humpty-Dumpty back together again, but in the end I think it looks pretty good.
With this plant now secure and off the ground I set to work on the rest of the garden. I added additional stakes to every plant, some even two or three, and placed clips to secure branches and trunks as far down as I could. Here are just a few of the other plants with the additional supports:
This morning when I checked the split cherry tomato plant I was thrilled that it was doing fine. I had expected it to be withered and the leaves and branches to be drooping toward the ground. Surprisingly it was fine. The leaves were fresh, the branches stiff, and none of the tiny tomatoes had fallen off.
Last year my plants were heavily laden with fruit as well, but it was later in the season and the trunks and branches were developed enough to withstand the weight. This year the plants need to do a little catching up, although already many of the plants are more than 5 feet tall.
Hubby suggested I thin the tomatoes a bit, something about “too much of a good thing.” I don’t have the heart. It’s been a long road to get the plants where they are and I’m going to do whatever it takes to harvest each and every one of the tomatoes. I think they’ve endured enough and deserve the opportunity to thrive the best they can, and for this I am — Simply Grateful.
Having fruit trees is great! Yep, so easy, so hands-off, so ‘plant it and forget it,’ — NOT!
Fruit trees are a lot of work, and I mean A LOT! There are so many things that can wrong, and most likely if it can go wrong, it will go wrong.
Of course the first issue when planting a new fruit tree is the stress of wondering whether or not the tree will survive the initial shock of being planted in your yard. For weeks, even months, you can keep vigil over your little trees not knowing if they are comfortable in their new home, if their roots have enough growing room, if the soil is to their liking. It’s normal for some leaf loss, but how much is really to be expected? 10%? 20%? 50%? Should I count how many leaves I started with to keep an accurate measure so as to know when I should be concerned?
Then there is the threat from Mother Nature’s cute little critters should you happen to have any fruit on the branches. Keeping the birds at bay is a full-time job. You can tie little tin plates to the branches with a washer hanging in the middle to scare them off, put up a scarecrow, or if you have the time just stand in the yard with a broom and shoo them off should they dare try to sneak some lunch from your branches.
And the squirrels, now they are a bit more stealthy when it comes to raiding your tree and eating the fruit. They sneak along the ground, sometimes hidden in the grass and dart up the tree trunk into the branches. This is where a good dog comes in handy but unless you plan on keeping the dog tied up next to the tree 24/7, there’s really no way to squirrel-proof the yard and tree.
Overall however animals are really the least of your worries. It’s the disease and insects that are the real fruit tree killers. These can attack the roots, the trunk, the branches, the leaves, and the fruit. Every part of the tree is susceptible to fungus, bacteria, infestation, and rot. And every one of these things require different types of measures to control or remedy.
For about 15 years we have had an Italian plum tree in our yard. Almost from day one we have been fighting brown rot. This occurs when fruit falls from the tree, rots, and then the rotting liquids get into the soil and infect the tree. For all our efforts of picking the fruit up as it falls the ground, there is no way really to ensure that every last plum gets picked up. Therefore we learned to begin spraying our tree before it begins blooming and continue until all the fruit is done. The tree still has brown rot, but will still produce fruit and continues to limp its way from season to season.
This year we decided to add a tart cherry, a sweet cherry, and a peach tree to the backyard. At the time I was excited about the prospect of having more fruit trees in the yard and hopefully in a year or two more fruit. Well, things have not gone so easily and my hopes for healthy trees has quickly diminished.
First one of the cherry trees didn’t survive the transplanting. Within a month it was dead and we were digging it out and replacing it. If this were the only issue, I could deal with that, but that was just the beginning.
Next the cherry tree that survived the initial planting decided to lose more than 50% of its leaves more than a month after it was planted. Two branches are now dead on the tree, leaving three lower branches still alive. At this point the tree has not lost any additional leaves for two months and we don’t know why the two upper branches withered and died, so we are playing the waiting game.
Then, all the fruit that actually survived the planting and began to grow were taken by the birds. Our trees are too small right now to interest the squirrels so at least there we dodged the bullet. But the birds certainly made up for it. I did put some nice noise making tin pans on the branches, but it was too late and no fruit will be harvested from the trees this year. Actually I didn’t expect any fruit, but watching the birds make short work of the tiny cherries and peaches opened my eyes to how difficult it is going to be to get a harvest in the future.
Not allowing me to relax at all, the next challenge was dealing with leaf spot on all three trees. In my research I learned this was a bacterial or fungal infection of some kind and very difficult to get rid of, but controllable. So we began spraying the trees so they wouldn’t lose all their leaves.
For about a week everything was good. No more leaf damage, no more leaf loss, and the trees actually looked like they were getting a little bigger.
Yesterday, though, things took a turn for the worse. As I was watering the garden I noticed that many, nearly most, of the leaves on the tart cherry tree (the one that had already lost more than 50% of its leaves earlier in the season) had huge portions of the remaining leaves on the tree eaten away. A closer look resulted in me finding this:
I snipped off the leaf and took to Hubby and asked him to investigate. Within minutes he was back and told me we had Pear or Cherry Slugs. Wonderful, just what we needed.
Apparently Cherry Slugs are the soft skinned larvae of the glossy black sawfly Caliroa Cerasi. Isn’t that nice? The sawfly lays eggs on the leaves and they hatch into the slugs. Interesting enough, as I was examining the tree for more slugs, there were a bunch of little black flies all over the tree as well. I guess these little guys have come home to roost.
Once the slugs reach full size they drop to the ground where they dig themselves into the soil to pupate. Then adults emerge, flying to the leaves to lay more eggs. This happens twice each year, getting worse the second time around if not nipped in the bud during the first cycle.
Although the tart cherry tree had lots of damage, and fairly quickly I might add because I’d just checked the tree two days before and there weren’t any slugs at that time (the eggs obviously hadn’t hatched), the sweet cherry tree had only one or two slugs on it. Hubby told me that there were some very easy solutions to this problem. The easiest was to just squish the slugs on the leaves.
Squish the slugs? With my fingers? Like that was going to happen.
Yes I changed dirty diapers, caught my kids throw-up, and have done some pretty gross things as a parent through the years, but somehow squashing a bug goes above and beyond for me. This is just one of those jobs meant for — Hubby.
So he examined the tree and quickly squished all he could find.
Next Hubby told me to mix up a bottle of water with a little dish-washing soap. Spraying this on the leaves will supposedly dry-up the slugs. They are very sensitive to the soap, so it presumably would kill anything Hubby missed.
I did this, happily. Not only did the tree get all squeaky clean, but it had a slight hint of lemons afterward. I did find one slug on a leaf as I sprayed and when it got sprayed, it stood up on its rear for a moment and then fell back to the leaf, flattening out in a pool of water. Well, at least this was working.
So as to make sure the slugs didn’t escape if they happened to fall to the ground, I also sprayed the ground around the tree generously.
Other remedies for these little guys include dusting the leaves with wood ash, chalk, flour, or powdered clay. Also, blasting the leaves with a garden hose should knock most of the slugs from the leaves, but then you still have the chance of them climbing back up the tree. This can be averted by generously spreading some vaseline around the base of the trunk of the tree.
So my trees have now been washed, greased, and powdered — like my kids when they were babies. I guess my trees are my new babies.
Oh, and although these slugs are reportedly only attracted to pear and cherry trees and I could find no mention of them infesting other fruit trees, I found flies and slugs on the peach tree this morning. I guess we’ll have to expand the name to Pear, Cherry and Peach Slugs!
For now, my trees are enjoying another hot and humid day, sticky from their morning bath of water and dish soap and I’m preparing some flour to sprinkle on the leaves tonight, just to cover all the bases. I’d have to say that growing fruit trees is definitely not for the faint at heart, but if these little trees make it and produce like our plum tree did the past three years (averaging more than 200 pounds of usable fruit a year), it will all be worth it, and this is why I am — Simply Grateful.
This is the first year I have planted zucchini in our garden. Last year I was given some from our neighbors and found so many wonderful uses for it, I knew I had to plant some for myself.
Being part of the squash family I felt fairly confident I’d be able to grow this, as I’d planted pumpkins in the past and enjoyed some success. Plus, everyone told me it was easy to grow and I’d have so much zucchini I wouldn’t know what to do with it.
Really? I wouldn’t know what to do with it? Well, over the winter I began collecting recipes for canning, freezing, and cooking with zucchini. Believe me, whatever the zucchini gods have in store for me, I’m ready.
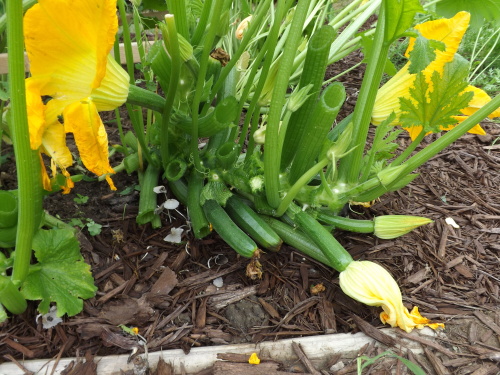
Anyway, planting the zucchini wasn’t much of a problem. I just hilled up some dirt, put in the seeds, watered, and waited. Fairly quickly the seeds germinated and quickly filled in the area around the tiny a-frame I built for it. It grew and grew and grew and grew. And I just watched. Never did it occur to me that I should be doing something. The leaves were beautiful, full, and spreading like wildfire.
Unfortunately, spreading is something I hadn’t really taken into account when I planted the zucchini. I figured it would climb the trusty A-frame and remain civil toward all the neighboring vegetables. How naive of me. Zucchini is quite a bully when it comes to being confined to a designated space. Actually “bully” is probably the wrong term here. Non-compliant would be more appropriate.
Fairly quickly the zucchini plants spread into the beets, radishes, and carrots. This might have been tolerated but when the zucchini leaves spread into the peppers and began covering several of them completely, I knew I couldn’t allow things to continue. Something had to be done.
I checked several of my gardening books, but none of them talked about pruning squash plants or how to control their spreading. They all however warned to be sure to give them enough space to grow. Oops! Was that there before? I must have skipped over that part.
The internet wasn’t much help either. Most people who pruned their zucchini had much smaller plants and they were through producing their first crops. Pruning I learned would help assure a second crop and continual crops through the summer and fall.
I also learned that most of the pruning was being done on leaves that were covered with fungus or drying up. My leaves were perfect. Aside from one Japanese beetle I found this morning, the leaves couldn’t have been in better shape. My concern was whether or not pruning a perfectly healthy plant would stunt or even stop the zucchini’s growth.
Still…I had to consider the rest of the garden. Left unchecked the zucchini would spread far into the peppers and definitely hinder growth and production. I had to chance it.
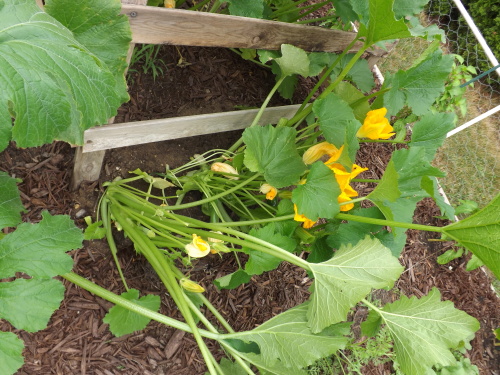
With pruning shears in hand I headed into the jungle this morning and began cutting. I cut and cut and cut and cut. Pruning is one of those things that I probably shouldn’t do, because I typically get carried away. You might recall my incident with sun scald last year on my tomatoes because of my over-zealous pruning tendencies (check out my post My Tomatoes Are Sunburned). Learning from my mistakes, however, especially in the garden, is something I have tried to force myself to do.
I first pruned all the largest leaves because I knew that they were the oldest and the outer most leaves. This gave me some room to work in as well as thinned things out considerably. Then I pruned away any leaves that were starting to turn yellow because they’d been buried under the over abundance of foliage.
Snip, snip, snip.
Cut, cut, cut.
Prune, prune, prune.
Stop, stop, stop.
Okay, an entire garbage can full of leaves later I could actually see some zucchini!
In fact, I was able to pick 6 right away and counted more than 15 babies that will probably be ready in a few days.
Much better! You can actually see the tiny A-frame now.
Now the garden isn’t being over taken by the zucchini, my pepper plants are free to grow and bask in the sun, the beets have gained their ground back, and I have zucchini in hand to eat and play with. Could it get any better? Not for this gardener, and for this I am — Simply Grateful.
Last July Hubby and I installed our first rain barrel for harvesting rainwater. At the time I wasn’t sure if this was legal in Michigan, but have since learned that the only two states that had laws against rainwater harvesting were Colorado and Nevada. Michigan, in fact, has legislation that encourages homeowners to collect and use rainwater.
For our first rain barrel I purchased a kit from Wal-Mart as well as a brand new 32 gallon garbage can. The kit cost around $20 and the can was $8, so for a $28 investment I thought it would be a good way to save some money on water bills.
It took us less than 1/2 and hour to install the rain barrel.
All summer as the rain barrel would fill, I would empty it into my watering can and water as much of the gardens and potted plants as I could before opting to use the hose attached to the house. This was so successful, because we had a fairly regular pattern of rain and dry spells, that this year I decided I wanted to expand our water collecting.
Although they do sell connector kits to attach rain barrels so as one fills it will overflow into the next, Hubby decided he could rig something up using — what else — PVC pipe. This would be a fairly inexpensive investment. The major expense would be in purchasing additional rain barrels/garbage cans and another initial rain barrel kit to attach to another downspout on the other side of the house.
Being frugal when it comes to spending money even on things that will eventually save us money in the future, I really did not want to fork out the money for more garbage cans. I mean if Hubby could come up with a way to attach the rain barrels together without having to buy the connecting kits, there had to be another option for the garbage cans as well.
Do you believe in: The universe shall provide? Well, I do, especially after what happened.
A few days after we decided we were going to expand our rain collection, we received a notification from our garbage collecting service that we would be issued a brand new 50 gallon garbage can (free of charge) that we would be required to use for all garbage pickup. They went on to state that any other trash cans could either be left on the curb for pickup/recycling or labeled with a “Compost” sticker and used for that purpose.
So being a daughter of a true sheeny-man-at-heart father, I knew what I had to do. The Sunday after the new garbage cans were delivered, which is the night before our garbage pickup, Hubby and I headed out into our subdivision in search of garbage cans with notes stuck to them stating “PLEASE TAKE.” That’s all we needed!
Within two weeks we had collected 6 perfectly usable garbage cans with lids. Four of them would be used for additional rainwater collection while the other two would be used for compost (why buy those paper bags when you can keep reusing the plastic cans?).
What luck! So for about $30 (which included the complete rain barrel kit we had to purchase for $20 to attach to a different down spout) we had four more rain barrels set up and ready to go. Three barrels were installed on the side of the house with room for more if I want.
The black tube running from the down spout to the garbage can in the back fills that can first, then any overflow is run to the can in front of it as well as the one to the right. In retrospect Hubby thinks we should have attached the cans together at the bottom with the PVC pipe so they would all fill up at the time. I’m not so sure. This year the rain water has been nearly non-existent, so rather than having one can full, I’d have three cans 1/3 full. Much harder to retrieve water from using a watering can. For now I’m content with they way he set them up.
The first rain barrel that was installed last year was moved into the garden directly below where it had been attached and a 50 gallon Rubbermaid garbage can that we found in someone’s trash was put on the patio.
Once the yellow can fills, the overflow goes into the can in the garden.
In all we now have the ability to collect 178 gallons of water with still room for expansion.
Now this is all well and good, but there is one catch to this wonderful rain harvesting system — it has to rain in order to use it!!!!
We installed all the new rain barrels at the beginning of June and since then we have not had enough rain to fill one rain barrel even half-way, let alone five. It has been very frustrating. Then, last night while we slept it happened! You got it — IT FINALLY RAINED. And we’re not talking just a passing shower. No, we got enough rain to fill every one of our rain barrels.
I didn’t take a picture of the other two full barrels, but they get filled before this one. Trust me, they are all full.
Success! And now we are really getting ambitious. Hubby doesn’t like the fact that I plan on just using my watering can to empty the barrels. It doesn’t bother me to walk back and forth, and in fact it would be a great way to workout my biceps, but Hubby has bigger ideas. He wants to invest in a pump that we would place in the full rain barrels and then attach to our hose and use it to water the gardens that way. It would be about a $60 investment, with coupons, and would save me a lot of time and he thinks aggravation.
I’m still not completely sold on the idea, probably because I haven’t had the joy of emptying all five barrels yet, but it is an option. For now, I am excited to have all my rain barrels full, the garden presently drenched with rain water, and a day off of watering, and for this I am — Simply Grateful.
Back in early May I planted two six-foot rows of carrots, watered them, and then waited. For nearly a month I checked and watered the carrot rows without any growth. Then about a week into June a few plants finally sprouted.
Disappointed I decided to replant, this time using a different type of carrot, where no carrots had come up. It has now been nearly a month since I planted and only a few more carrots have shown themselves.
This is the carrot and radish section of the garden. Carrots are supposed to be in rows 1, 3, and 5. Not many to be seen.
Yesterday I harvested what was actually usable of the first planting of carrots, about two months after being planted, and found them to be small and many of them were carrot creatures.
I planted three rows of carrots, twice, and this is pretty much more than half of what actually came up. Not much of a harvest, but they are sweet.
Back in 2014 when I had my carrot garden in a different location I also had some carrot creatures, but they were at least big, this years are tiny. Check out my post at Simply Grateful Housewife Carrot Creatures.
So why can’t I get my carrots to grow? Is it the new location? Is it the soil? Is it the seeds? Well once again I headed to the computer and the Internet for some answers. Turns out it’s not the location, soil or the seeds. It’s just me!
Yep, turns out whenever I’ve planted carrots in the past we have had typical Michigan weather. This means we would have regular rain fall. This coupled with me watering the garden in between rain falls assured my carrot growing success.
This year Michigan has been dealing with a terrible drought. Since the end of May we have had no more than 1″ of rain. In June there were four days when there was any measurable rain and so far this July we’ve had one day. Now I do water, but only every other day, sometimes every third day (especially right after the water bill comes in).
According to the information I read, carrots need to be watered each and every day after the seeds are sown into the soil without fail. It isn’t a matter of watering them when they are dry, it is keeping them in a constant state of being wet. This means that for the entire time of germination, which can range from 12 to 18 days, I should have been watering the rows of carrots. Without that, they didn’t have a chance.
The few that actually did germinate and finally grow were a gift, or if you’re a pessimist a slap in the face. I’ll go with gift here for now.
As for the Carrot Creatures I have, well that is the result of planting my carrots in clay. We don’t enjoy the luxury of wonderfully loose soil in our area. We have tightly compacted clay and the three to six inches of top soil that I’ve put on top of the clay doesn’t give the carrots much room to spread out. Unfortunately this probably isn’t going to change because I don’t have an area in the garden that I can build up a foot or more of dirt for them to grow. Although this might be a nice project to consider for a box garden.
Last year I built a box to grow potatoes in and placed it in the garden right along the other rows of potatoes I’d planted. The theory around the box garden was that by hilling the potato plants as they grew and building up the sides of the box, I’d end up with a box full of potatoes by the end of the summer. Well, this didn’t happen. In fact I ended up with less than a handful of potatoes. It is entirely possible I did something wrong, but after that incident I decided that potato gardening was just too much work for not much yield.
This is the first level of the potato box with the potato plants sprouting up.
As the potato plants grew, I added more boards on the sides and filled the box with dirt.
By fall the box had five levels added and the potato garden looked like this.
When I removed the box and dug up the plants, there was nothing to be found.
Building up a small area in the existing garden using the boards from the old potato box might be a good option for next year for growing carrots rather than Carrot Creatures. (See Suzanne, even when something doesn’t necessarily work, it still has the potential to inspire – Thanks!) I won’t need to hill the carrots or build up the box as they grow, but a box built within the garden or along side it…now that might work.
So what have I learned? First and foremost, when I plant my carrots I will water them DAILY until they sprout. This is the only way to make sure they germinate. Second, if I want long straight carrots I’ll have to do something about the clay. Otherwise I’m destined to enjoy visitations from Carrot Creatures.
At any rate, another lesson learned in the garden and I am that much smarter (or so I think) for it, and for this I am — Simply Grateful.